Other than my first project in stained glass, and a fused glass course, I have been very much self taught over the last 16 years. Many times I have felt that stained glass retailers did not want to give up information unless you bought a class from them. This is very sad. Well, with the development of the internet and many wonderful glass sites and forums, this is slowly changing. And I certainly would never paint all glass artists with the same brush. I'm know that I am not the only one with a passion to learn and a passion to teach. What a rewarding experience to be able to give someone the information to make a process easier or teach them a new approach that will open up new possibilities.
Here are a couple of tips that I learned recently that I want to pass on to you. It is my hope that practical ideas in my blog will be a help and therefore a blessing to you.
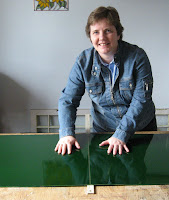 There are many ways to cut sheets of glass such as with running pliers or over the edge of a table, but a more reliable way that I've learned from a local retailer is to use a wooden yardstick. I score the glass with my cutter and then place the glass over a yardstick centering it over the score. With light pressure I push with my hands on either side of the yardstick. Always wear safety glasses to protect your eyes.
As stained glass artists something we do quite often is write on glass with a permanent marker, either tracing a pattern piece or labeling the identification of the glass. Usually, the marker just wipes off easily with a little moisture. When the marker has sat for a long period of time and just won't come off, try an eraser. This exact situation happened to me one day when my step son was visiting. Thanks Jay for the tip; it has worked great for me.
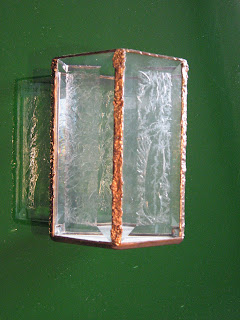
And the third tip today, I picked up from Dayle, a stained glass mentor of mine. Sometimes you want to do something a little different from the norm. These candle shelters with a "textured" solder appearance are an example of this. The textured effect on the solder is made by lightly applying a relatively damp sponge to the surface of the bead shortly after drawing it. Try it a few times until you achieve the desired effect to become familiar with how wet the sponge has to be and how hard you have to press it into the soft bead.
Will any of these tips help you? Feel free to comment and let us know. And if you have a glass related tip to share, please tell us about it.


